
This is something that keeps coming up on different projects, so I’d like to share how I usually do this. There are some examples out there which try to describe a very generic solution which can be used in almost any case. However, such solutions very quickly become very complex. To keep things simple, I have tried to keep this example fairly specific but adaptable to a wide range of circumstances. Specifically this example is using a fixed hierarchy structure with a fixed number of levels, each of which will be represented by a different table.
Last time I introduced the data model that will sit behind the tree lookup. This time I’ll show how to build the tree on demand to improve performance, and then how to build the actual tree lookup form.
Building the tree
We’ll start at the top of the tree, the EB_Libraries table. Add a new static method called buildTree.
public static void buildTree( FormTreeControl _tree, ImageListAppl _imageListAppl )
{
  EB_Libraries libraries;
  EB_Aisles aisles;

  while select Name, RecId
          from libraries
         order by Name
         group by Name, RecId
         outer join count( RecId )
          from aisles
         where aisles.LibraryRecId == libraries.RecId
  {
    _tree.addItem( 0, 0, new FormTreeItem( libraries.Name, _imageListAppl.image( 12039 ), int642int( aisles.RecId ), libraries.RecId ) );
  }
}
Starting at the top, we take the tree control we’re taking the tree control we’re going to populate and an image list which contains the icons we can use. I’ve chosen some icons that belong to the same icon family just to achieve a consistent look and feel, but choose whichever icons work best for you.
public static void buildTree( FormTreeControl _tree, ImageListAppl _imageListAppl )
Next is the query to get the name and record ID of all libraries. We also outer join to a count of EB_Aisles records related to each library. Why do we need to do that join? Simple, we’re going to delay loading of the lower levels until the relevant branch is expanded in the tree control. If we’re to be able to provide the user with a [+] indicator to expand, we’ll need to know if there will be any child records.
while select Name, RecId
        from libraries
       order by Name
       group by Name, RecId
       outer join count( RecId )
        from aisles
       where aisles.LibraryRecId == libraries.RecId
Then, inside the loop, we’ll create FormTreeItem objects for each library and insert at the root level of the tree (the first zero), at the end of the items list (the second zero), with a particular icon, number of aisles in the library and finally we’re stuffing the library’s RecId field into the data property of the item.
_tree.addItem( 0, 0, new FormTreeItem( libraries.Name, _imageListAppl.image( 12039 ), int642int( aisles.RecId ), libraries.RecId ) );
Now repeat the same process for the EB_Aisles table. The purpose of the code is the same as for libraries, the only real difference being that we will accept a TreeItemIdx parameter for the library item we’re going to add to, as well as the record ID of the library. You’ll see these being used in the addItem() call and the query, respectively.
public static void buildTree( FormTreeControl _tree, ImageListAppl _imageListAppl, TreeItemIdx _parentIdx, EB_LibraryRefRecId _libraryRecId )
{
  EB_Aisles aisles;
  EB_Racks racks;

  while select Name, RecId
          from aisles
         order by Name
         group by Name, RecId
         where aisles.LibraryRecId == _libraryRecId
         outer join count( RecId )
          from racks
         where racks.AisleRecId == aisles.RecId
  {
    _tree.addItem( _parentIdx, 0, new FormTreeItem( aisles.Name, _imageListAppl.image( 12040 ), int642int( racks.RecId ), aisles.RecId ) );
  }
}
And for EB_Racks, which works in exactly the same way.
public static void buildTree( FormTreeControl _tree, ImageListAppl _imageListAppl, TreeItemIdx _parentIdx, EB_AisleRefRecId _aisleRecId )
{
  EB_Racks racks;
  EB_Shelves shelves;

  while select Name, RecId
          from racks
         order by Name
         group by Name, RecId
         where racks.AisleRecId == _aisleRecId
         outer join count( RecId )
          from shelves
         where shelves.RackRecId == racks.RecId
  {
    _tree.addItem( _parentIdx, 0, new FormTreeItem( racks.Name, _imageListAppl.image( 12041 ), int642int( shelves.RecId ), racks.RecId ) );
  }
}
The buildTree() method for EB_Shelves is simpler, as there are no children below this level. Thus, we don’t need the outer join and group by this time, and we’ll just pass a zero to the addItem() call’s children parameter.
public static void buildTree( FormTreeControl _tree, ImageListAppl _imageListAppl, TreeItemIdx _parentIdx, EB_RackRefRecId _rackRecId )
{
 EB_Shelves shelves;

while select Name, RecId
 from shelves
 order by Name
 where shelves.RackRecId == _rackRecId
 {
 _tree.addItem( _parentIdx, 0, new FormTreeItem( shelves.Name, _imageListAppl.image( 12047 ), 0, shelves.RecId ) );
 }
}
The lookup form
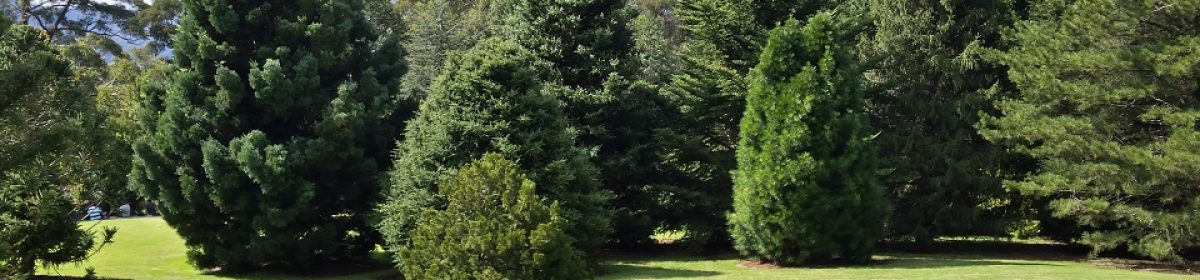
Next, create a new form EB_ShelfLookup and set its design properties as shown here:
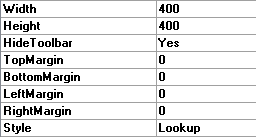
To the design, add a Tree control and set width/height to be column width/height:
Let’s start adding supporting members and methods to the form. First we need an ImageListAppl object to store the icons for the tree control. As it will be used from different places around the form we’ll add it to the form’s class declaration.
public class FormRun extends ObjectRun
{
  ImageListAppl imageListAppl;
}
Override the init() method:
public void init()
{
  super();

  imageListAppl = new ImageListAppl( 32, 32 );
  imageListAppl.add( 12039 );
  imageListAppl.add( 12040 );
  imageListAppl.add( 12041 );
  imageListAppl.add( 12047 );

  EB_Libraries::buildTree( Tree, imageListAppl );

  this.buildTree();
}
This creates a new ImageListAppl object, setting the icon size to 32 by 32 pixels. It then adds the IDs of the 4 icons we will use to represent the different levels of the tree.
Next, it calls buildTree() to build the initial state of the tree. As we’re doing delayed loading, this will actually only load the libraries level. We’ll take care of loading the rest of the information on demand, and we’ll do that by overriding the expanding() method on the tree control:
public boolean expanding( int _idx, FormTreeExpand _action, anytype _data )
{
  boolean      ret;
  FormTreeItem expandingItem = Tree.getItem( _idx );
  int          depth   = 0;
  int          nextIdx = _idx;

  if( !expandingItem.stateExpandedOnce() )
  {
    // Find which depth level of the tree we're on, by moving up the parent() relationship until we hit the root.
    while( nextIdx != 0 )
    {
      depth++;
      nextIdx = Tree.getParent( nextIdx );
    }

 // Load the child records based on the expanding index and the data() property of the item.
    switch( depth )
    {
      case 1:
        EB_Aisles::buildTree( Tree, imageListAppl, _idx, any2int64( _data ) );
        break;

      case 2:
        EB_Racks::buildTree( Tree, imageListAppl, _idx, any2int64( _data ) );
        break;

      case 3:
        EB_Shelves::buildTree( Tree, imageListAppl, _idx, any2int64( _data ) );
        break;
    }
  }

  return super( _Idx, _action, _data );
}
Returning a value
Returning a value to a reference group control is different from returning to a string. A reference group control needs a record buffer rather than a string. As a consequence we can’t use closeSelect() to return the value, but have to call closeSelectRecord() instead. Let’s add a new method to the form:
public void selectAndClose()
{
  int          idx  = Tree.getSelection();
  FormTreeItem item = Tree.getItem( idx );
  EB_Shelves   shelves;

  select firstOnly shelves
   where shelves.RecId == item.data();

  element.closeSelectRecord( shelves );
}
The tree control does not work well in a lookup without a bit more work. We’ll want to be able to select a value by hitting Enter or by double-clicking on an item, so we need to override task(). Overriding task() is getting a hook into the event loop for the form. Hitting the Enter key causes AX to call this method with a _taskId code of 288.
public int task( int _taskId )
{
  int ret = super( _taskId );

  if( _taskId == 288 )
  {
    element.selectAndClose();
  }
  return ret;
}
If we get a _taskId of 288, we’ll call selectAndClose().
To handle the double-click, override mouseDblClick() on the tree control.
public int mouseDblClick( int _x, int _y, int _button, boolean _ctrl, boolean _shift )
{
  int ret = super( _x, _y, _button, _ctrl, _shift );

  element.selectAndClose();

  return ret;
}
Simple and easy, we just call super() and then selectAndClose().
There’s one more thing to do: We’ll need to change the behaviour of mouse clicks. When clicking in the tree control, the standard behaviour is to process the event and then pass the click up to the parent control for further processing. (The event bubbles up) When that event reaches the form, the standard behaviour of a lookup form is to close when something is clicked.
To prevent that we’ll need to override the mouseUp() method on the tree control to return a 1. This indicates to AX that we have handled the click and we do not want the event to bubble up.
public int mouseUp( int _x, int _y, int _button, boolean _ctrl, boolean _shift )
{
  super( _x, _y, _button, _ctrl, _shift );

  return 1; // Prevent the lookup form from closing on single click.
}
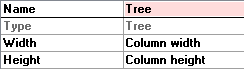
Last thing to do on the form for now is to add a data source. We will not actually use the data source, but AX requires a lookup form to have a data source of the type that we are looking up in. In our case, we’re looking up in the EB_Shelves table, so add that as a datasource, with properties as shown here:
Update to the EB_ShelfRefRecId data type
In order for AX to use our custom lookup form by default, we need to set the FormHelp property on the EB_ShelfRefRecId data type to point to EB_ShelfLookup.

Back to the EB_Books form
Now go back to and bring up the context menu on the EB_Books form. Select “Restore” and “Compile”. This should make sure that the form will pick up and use the new lookup form. I have seen that AX does not consistently pick up such changes without a restore and recompile, so I have made it a habit to always do so.
Open the form and it will look similar to before. That is to be expected, as we haven’t made any changes to the form itself, yet. However, when you create a new record and click the drop-down (Isn’t that odd, that a drop down is actually a look up…?) there will be some changes.
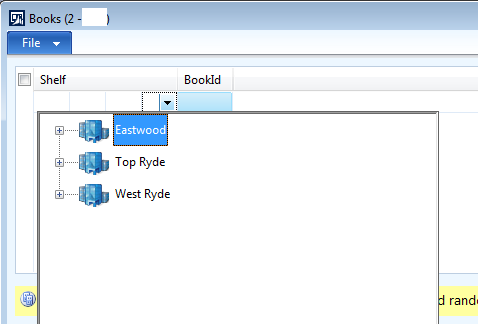
That’s cool… Now try to expand some of the items, all the way down to a shelf.
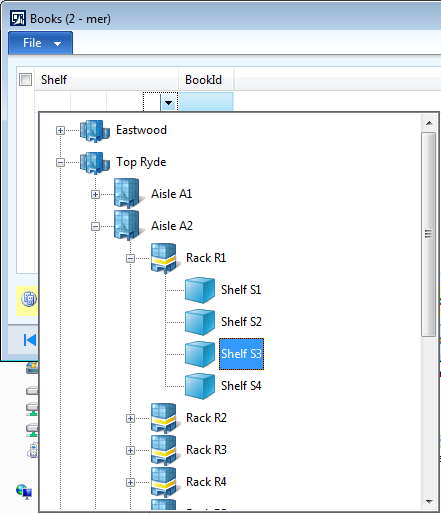
Oh wow… This is really starting to look promising.
Select a shelf, either by hitting Enter or by double-clicking.
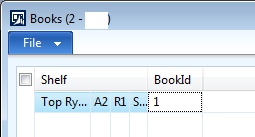
Nice, AX has filled in the reference fields for us. It did show some warning messages about missing joined cursors which are caused by the lookup only returning a single record whereas the replacement key contains fields from multiple tables. Don’t worry, we’ll fix that in the next part.
Wrapping up
The lookup form can be improved in a couple of areas to make it more user friendly, and we’ll need a better way to represent the selected shelf. And that’s what I’ll show next time.