

This is the first part of a multi-post series that explains how to do a tree lookup in a reference group control on an AX form.
It’s simple, just look at those trees up there…
Oh, seriously…
This is something that keeps coming up on different projects, so I’d like to share how I usually do this. There are some examples out there which try to describe a very generic solution which can be used in almost any case. However, such solutions very quickly become very complex. To keep things simple, I have tried to keep this example fairly specific but adaptable to a wide range of circumstances. Specifically this example is using a fixed hierarchy structure with a fixed number of levels, each of which will be represented by a different table.
I’ll show how to build the lookup, how to load the tree items on demand to speed up the loading times as well as how to properly select and return the selected record. I’ll also show some suggestions for how to build the reference group properly so it is easy for the user to understand the information presented to him/her and to understand what to do.
This first part of the series shows how to set up the tables and their relationships.
To use an example which is easy to relate to, imagine a local council operating multiple libraries. I’ll organise this into a structure like Library => Aisle => Rack => Shelf, each of which will be represented by a separate table. (I know this is very analogous to the Dynamic AX site/warehouse structure, but this is just choosing a simple example.)
In addition to the tables representing the levels of the tree, there will be a table representing books and containing a reference back to the specific shelf a book can be found on.
For clarity, I’ll keep things simple and only add the bare minimums to each table. Things will get fairly repetitive as a result, as the data model is virtually identical at each level of the tree. If you don’t want to create all of this manually, there will be an XPO in the last part of this series, containing the full set of objects discussed.
As usual, use whatever object name prefix you need, according to your naming conventions.
Libraries table
This is the top-level table in the hierarchy.
![]()
Add the following fields:


We’re going to need an index to use as a replacement key, so let’s add one on the LibraryId field. Setting this as replacement key will also update the AutoIdentification field group to match the index keys.
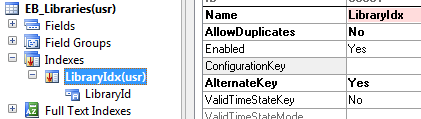
To support links from the following table back to this one, add a new Extended Data Type (EDT), int64 type. The EDT needs a table reference to the RecId field in this table.

That relation needs to be backed by an index, so make sure there is an index on RecId, and that it is the primary key for the aisles table. The index-related properties on the table should look like this:

Aisle table
This table describes the aisles within each library.
![]()
Add the following fields:


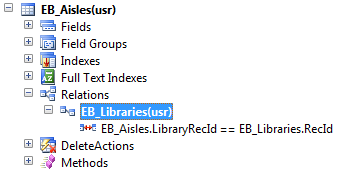
We need a relation on LibraryRecId to point to RecId in EB_Libraries. This will be added automatically when adding the LibraryRecId field, based on the table relation specified on the EDT. If you missed this, or clicked “No” on the prompt, add one manually now.
We’re going to need an index to use as a replacement key, so let’s add one on the AisleId field. However, there can be multiple aisles with the same ID as long as they are in different libraries, so we’ll need LibraryRecId as the leading key. Setting this as replacement key will also update the AutoIdentification field group to match the index keys.
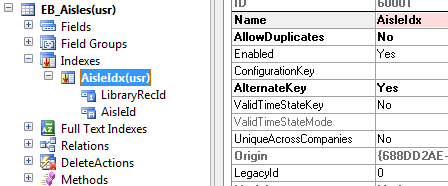
To help speed up queries, we’ll make sure all aisles for a library are stored next to each other in the database, so we’re going to make this the clustered index for the table as well.
To support links from the following table back to this one, add a new Extended Data Type (EDT), int64 type. The EDT needs a table reference to the RecId field in this table.

That relation needs to be backed by an index, so make sure there is an index on RecId, and that it is the primary key for the aisles table. The index-related properties on the table should look like this:

Racks table
This table describes the racks within each aisle.
![]()
Add the following fields:


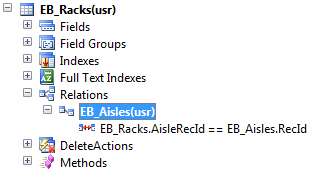
We need a relation on AisleRecId to point to RecId in EB_Aisles. This will be added automatically when adding the AisleRecId field, based on the table relation specified on the EDT. If you missed this, or clicked “No” on the prompt, add one manually now.
We’re going to need an index to use as a replacement key, so let’s add one on the RackId field. However, there can be multiple racks with the same ID as long as they are in different aisles, so we’ll need AisleRecId as the leading key. Setting this as replacement key will also update the AutoIdentification field group to match the index keys.
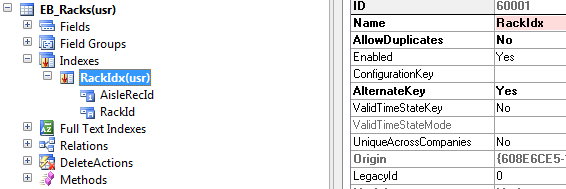
To help speed up queries, we’ll make sure all racks for an aisle are stored next to each other in the database, so we’re going to make this the clustered index for the table as well.
To support links from the following table back to this one, add a new Extended Data Type (EDT), int64 type. The EDT needs a table reference to the RecId field in this table.

That relation needs to be backed by an index, so make sure there is an index on RecId, and that it is the primary key for the aisles table. The index-related properties on the table should look like this:

Shelves table
This table describes the shelves in each rack.
![]()
Add the following fields:


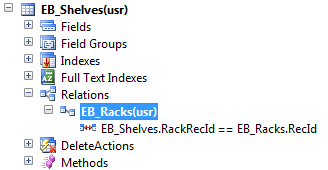
We need a relation on RackRecId to point to RecId in EB_Racks. This will be added automatically when adding the RackRecId field, based on the table relation specified on the EDT. If you missed this, or clicked “No” on the prompt, add one manually now.
We’re going to need an index to use as a replacement key, so let’s add one on the ShelfId field. However, there can be multiple shelves with the same ID as long as they are in different racks, so we’ll need RackRecId as the leading key. Setting this as replacement key will also update the AutoIdentification field group to match the index keys.
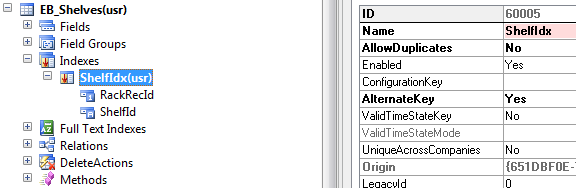
To help speed up queries, we’ll make sure all racks for an aisle are stored next to each other in the database, so we’re going to make this the clustered index for the table as well.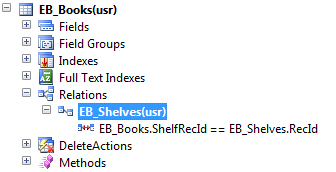
To support links from the books table back to this one, add a new Extended Data Type (EDT), int64 type. The EDT needs a table reference to the RecId field in this table.

That relation needs to be backed by an index, so make sure there is an index on RecId, and that it is the primary key for the aisles table. The index-related properties on the table should look like this:

Demo data
We need some demo data, which we can create through a simple job.
static void EB_FillLibraries( Args _args )
{
  EB_Libraries libraries;
  EB_Aisles    aisles;
  EB_Racks     racks;
  EB_Shelves   shelves;
  int l, a, r, s;

  container conLibraries = [ "Top Ryde", "Eastwood", "West Ryde" ];
  container conAisles    = [ "A1", "A2", "A3", "A4", "A5", "A6" ];
  container conRacks     = [ "R1", "R2", "R3", "R4", "R5", "R6", "R7", "R8" ];
  container conShelves   = [ "S1", "S2", "S3", "S4" ];

  ttsBegin;

  for( l = 1; l <= conLen( conLibraries ); l++ )
  {
    libraries.clear();
    libraries.LibraryId = conPeek( conLibraries, l );
    libraries.Name      = libraries.LibraryId;
    libraries.insert();

    for( a = 1; a <= conLen( conAisles ); a++ )
    {
      aisles.clear();
      aisles.LibraryRecId = libraries.RecId;
      aisles.AisleId      = conPeek( conAisles, a );
      aisles.Name         = strFmt( "Aisle %1", aisles.AisleId );
      aisles.insert();

      for( r = 1; r <= conLen( conRacks ); r++ )
      {
        racks.clear();
        racks.AisleRecId = aisles.RecId;
        racks.RackId     = conPeek( conRacks, r );
        racks.Name       = strFmt( "Rack %1", racks.RackId );
        racks.insert();

        for( s = 1; s <= conLen( conShelves ); s++ )
        {
          shelves.clear();
          shelves.RackRecId = racks.RecId;
          shelves.ShelfId   = conPeek( conShelves, s );
          shelves.Name      = strFmt( "Shelf %1", shelves.ShelfId );
          shelves.insert();
        }
      }
    }
  }

  ttsCommit;
}
Copy/paste this into a new job and run it. It will create identical layouts for each library but it’s good enough for this purpose.
Books table
This table describes books, which can be on any shelf within the whole library.
![]()
Add the following fields:


We need a relation on ShelfRecId to point to RecId in EB_Shelves. This will be added automatically when adding the ShelfRecId field, based on the table relation specified on the EDT. If you missed this, or clicked “No” on the prompt, add one manually now.
As we’re not going to have anything referencing the books table, we’re not adding any indexes or replacement keys. What we will do, however, is to add a form.
Add a simple form containing EB_Books as a datasource and a single grid set to fill the entire form. The grid should use EB_Books as its datasource, and contain two fields, ShelfRecid and BookId. Let’s call the form EB_Books.
Notice how AX automatically replaced ShelfRecId with a reference group containing the replacement keys for each hierarchy level all the way up to LibraryId.
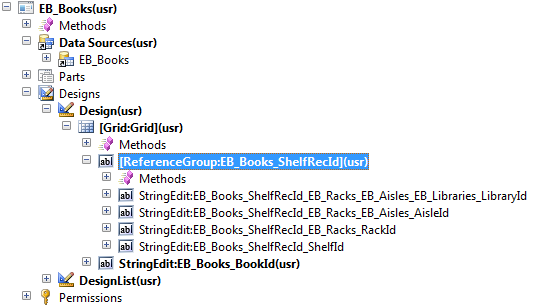
Quite helpful, actually. Let’s see what it looks like.
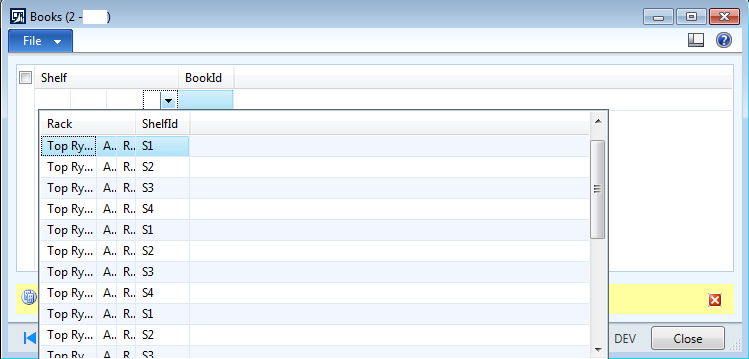
OK, it shows each field in the hierarchy.
The drop-down only allows to select the Shelf level, and there are no drop-downs on any of the other levels. And… Every single shelf record is displayed. Uuuughhh….
To solve this, we need a tree lookup, and that’s probably why you’re reading this anyway. I’ll get back to that in the second part of the series.